Thursday, February 18, 2010

How to create Status Bar Notifications


A status bar notification is used to notify the user of a system event, like an sms being received or a new device being detected, without interrupting the user from whatever other task they might be doing with their phone.

The status bar area is located at the top of the screen and the user can pull this area to expand it, and show a history of notifications.
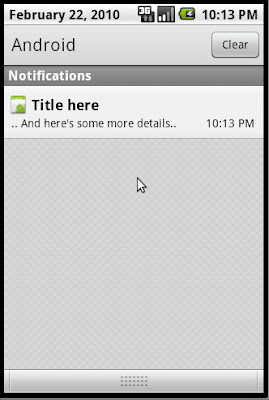


If a Notification has been setup to include an enclosed Intent, selecting that particular notification in this expanded view can fire the Intent, taking the user to an Activity screen of the related application, or do any of the many other things that Intents can do.

You can also configure the notification to alert the user with a sound, a vibration, and flashing lights on the device.

A background Service should never launch an Activity on its own in order to receive user interaction. The Service should instead create a status bar notification that will launch the Activity when selected by the user.

A status bar notification should be used for any case in which a background Service needs to alert the user about an event.


Here is a simple method that creates and displays a notification when passed a string msg :


public void displayNotification(String msg)
{
NotificationManager manager = (NotificationManager) getSystemService(Context.NOTIFICATION_SERVICE);
Notification notification = new Notification(R.drawable.icon, msg, System.currentTimeMillis());

// The PendingIntent will launch activity if the user selects this notification
PendingIntent contentIntent = PendingIntent.getActivity(this, REQUEST_CODE, new Intent(this, ExpandNotification.class), 0);

notification.setLatestEventInfo(this, "Title here", ".. And here's some more details..", contentIntent);

manager.notify(NOTIFICATION_ID, notification);

}


.. Which you can call simply like this:


displayNotification("Hi, I'm a Statusbar Notification..");


.. Easy, isn't it?

Sunday, February 14, 2010

Want to display a quick message to your users? Use some Toast!


A toast is a notification view that contains a quick little message for the user. All it does is display the message, it's not interactive at all.

The toast class helps you create and show those.

When this view is shown to the user, it appears to float over the application. It will never receive focus as the user may be in the middle of typing something else. The idea is to be as unobtrusive as possible, while still showing the user the information you want them to see. Two possible examples are a volume control, and a brief message saying that your settings have been saved.

The easiest way to use this class is to call one of the static methods that constructs everything you need and returns a new Toast object.

A piece of toast is typically a simple text message, an image, or a combination of text and image.
You don't have control on the toast duration. There are only two states LENGTH_LONG and LENGTH_SHORT.

For this example we have added an image to one of the drawable folders under 'res' in our project, we refer to it simply like this:

view.setImageResource(R.drawable.flash);

Our image is actually called flash.png, note that we don't need to include the 'png' extension in our Android code, it already knows what we're talking about ;)

Here are 3 methods, demonstrating the above.

First, just show an image:

private void imageToast()
{
Toast toast = new Toast(getApplicationContext());
ImageView view = new ImageView(getApplicationContext());
view.setImageResource(R.drawable.flash);
toast.setView(view);
toast.show();
}


This method just displays a text toast:

public void textToast(String textToDisplay) {
Context context = getApplicationContext();
CharSequence text = textToDisplay;
int duration = Toast.LENGTH_SHORT;

Toast toast = Toast.makeText(context, text, duration);
toast.setGravity(Gravity.TOP|Gravity.LEFT, 50, 50);
toast.show();
}


.. And this method displays a Toast that contains both an image and text:

public void textAndImageToast(String textToDisplay)
{
Toast toast = Toast.makeText(getApplicationContext(), textToDisplay, Toast.LENGTH_LONG);
View textView = toast.getView();
LinearLayout lay = new LinearLayout(getApplicationContext());
lay.setOrientation(LinearLayout.HORIZONTAL);
ImageView view = new ImageView(getApplicationContext());
view.setImageResource(R.drawable.flash);
lay.addView(view);
lay.addView(textView);
toast.setView(lay);
toast.show();
}

You can call each of these like this:

textToast("This is a text toast");
        imageToast();

textAndImageToast("This is a text and image toast");


And here are the results:

A text Toast


A text & image Toast


this is an image Toast


Here is the same image Toast with default Gravity for better demonstration purposes


Hope that makes sense.
.. Till next time, happy coding :)


Monday, February 1, 2010

How to populate a Spinner widget from a database


Yesterday we saw how to populate a Spinner widget from an Array, and today, as promised, I'll show you how to populate a Spinner widget from a database.

This tutorial assumes that you're using the same code we used previously (link above), essentially the only differences are that we're using a different type of Adapter (a SimpleCursorAdapter this time) and populating it with the results of a query from a database table, and we're using a separate layout item to put our colour names


Here is our new layout, called db_view_row.xml:

<LinearLayout android:id="@+id/LinearLayout01"
android:layout_width="fill_parent"
android:layout_height="fill_parent"
xmlns:android="http://schemas.android.com/apk/res/android">

<TextView android:text=""
android:id="@+id/tvDBViewRow"
android:layout_width="wrap_content"
android:layout_height="wrap_content">
</TextView>
</LinearLayout>


put this file in your res/layout directory in your project.


Let's assume for this example that you've already populated your database table with the same list of colours that we used previously.

Here's the statement to create our table structure:


CREATE TABLE "colours" (
"_id" INTEGER PRIMARY KEY AUTOINCREMENT NOT NULL,
"colourName" TEXT NOT NULL
)


In our database adapter class we have a method called fetchAllColours(), which has the responsibility (probably no surprises here) of fetching all our colours ;).


At the top of our class we declare some static variables we're going to use :


public class TestDBAdapter {

public static final String KEY_TITLE = "colourName";
public static final String KEY_ROWID = "_id";

//..rest of class continues from here..


Here is this method also from our TestDBAdapter class:

public Cursor fetchAllColours()
{
if (mDb == null)
{
this.open();
}


/* here we check if our db exists as the connection might have been closed unexpectedly... and open it if it doesn't already exist*/


String tableName = "colours";

return mDb.query(tableName, new String[] { KEY_ROWID, KEY_TITLE}, null, null, null, null, null);

}


... which returns a database Cursor to our method below..


private void fillData() {
Cursor coloursCursor;
Spinner colourSpinner = (Spinner) findViewById(R.id.my_colour_spinner);
coloursCursor = thisTestDBAdapter.fetchAllColours();

startManagingCursor(
coloursCursor);
/*Create an array to specify the fields we want to display in the list (only the 'colourName' column in this case) */

String[] from = new String[]{TestDBAdapter.KEY_TITLE};

/* and an array of the fields we want to bind those fields to (in this case just the textView 'tvDBViewRow' from our new
db_view_row.xml layout above) */

int[] to = new int[]{R.id.tvDBViewRow};

/*
Now create a simple cursor adapter.. */

SimpleCursorAdapter colourAdapter =
new SimpleCursorAdapter(this, R.layout.db_view_row,
coloursCursor, from, to);

/* and assign it to our Spinner widget */

colourSpinner.setAdapter(colourAdapter);
}


Update: Due to popular demand, here is a project that demonstrates this concept:
Spinner from Database example.


.. Let me know if you're having any access issues, it's just hosted publicly from my google docs.


I've learnt my lesson, I'm going to be including an example project with all future posts :)

Thanks for your support

This site has only been in existence for 6 weeks, I just wanted to say thankyou for visiting, wherever you are!

:)

Please feel free to post comments on anything you see, and if you have any suggestions for articles, just let me know.